
Repairs And Troubleshooting
How To Clean Your Sensors
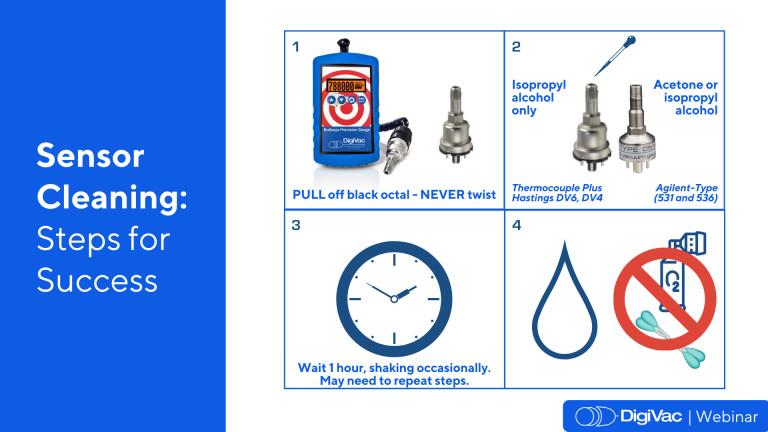
DigiVac recommends cleaning your sensor regularly. It is important to clean your sensor with an appropriate solvent. Before you call for service, be sure to first try cleaning your sensor, following our sensor cleaning steps for success. We overview how to appropriately remove the sensor from the cable, how to funnel the solvent, and how to let it dry.
If Your Gauge Won't Power Up

One of the most common issues we tackle in tech support here is a gauge that won’t power up. Here we’ll discuss some common fixes.
For battery-powered gauges, start there. Are they oriented correctly according to the sticker inside the unit? Here we have pictured the sticker inside our Bullseye Precision Gauge showing the alignment of the battery.
If they are, have you used a voltmeter or battery tester? Even if you haven’t been using the gauge, the circuit exerts a small trickle current drain on the batteries, so they may be dead inside the unit, especially if the gauge hasn’t been used for a while. Even batteries that are new in the box can be dead already, depending on their age. You can use a standard voltmeter to measure the DC voltage of the battery – AA batteries are 1.5 volts, so the closer to that, the better.
Sometimes when dead batteries are left inside a device for a long time, the batteries will leak and corrode the terminals, leaving a chalky white substance and preventing the gauge from turning on. In this case, the gauge must be repaired by DigiVac.
The Bullseye Precision Gauge specifically has 2 modes of power – it can run on 4 AA batteries or an external power source using a Micro-USB cable, the same type used to charge many Android phones. However, this cable is NOT a battery charger – it is for external power only, and it will not replenish dead AA batteries. This setup is common for long-term installations and logging where the gauge cannot be turned off to replace its batteries. The gauge can be run with no batteries in it just fine with the cable alone. Many customers do this. Try powering your gauge through the Micro-USB port on the top. If it turns on, your issue is with the battery power.
Sometimes through vigorous plugging and unplugging, the USB connector can break loose off the internal circuit board. In this instance, the circuit board assembly must be replaced.
For gauges powered with an external power supply, such as our Model 200, Model 215V and StrataVac gauges, try testing the power supply with a multimeter. Set your meter to DC volts and insert one probe into the barrel of the supply end and touch the other probe to the outside of the barrel, and ensure that the supply reads the voltage written on it.
If your power supply tests OK and the gauge still will not turn on, consider if you or someone in your facility has attempted to power the gauge with an incompatible supply. Higher-voltage supplies may damage the CPU or amplifier on the internal circuit board, meaning the gauge must be remitted to DigiVac for repair.
If Your Gauge Has an Error Message
Our gauges have error messages built in to warn users of sensor damage, poor connections or incorrect configurations. Here we’ll discuss what those error messages mean and how to interpret the problem from there.
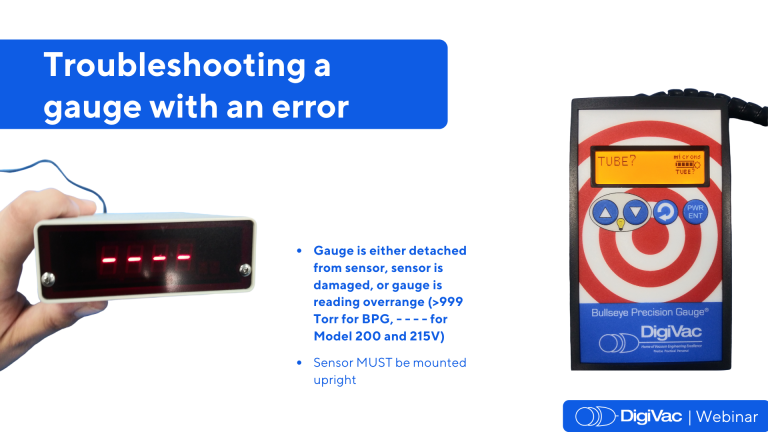
TUBE? Is an error message shown on the BPG that can mean a few different things. We use the terms tube and sensor interchangeably, so the gauge is asking about the status of the tube. The gauge will read TUBE? If the tube is disconnected entirely, or if the gauge does not recognize the tube, or if the gauge is reading a pressure out of the bounds of the gauge’s range, meaning over 999,000 microns or 999 Torr. Note that other thermocouple gauges, the Model 200 and 215V, will show dashes if those same conditions exist, and the StrataVac will display Error. So we use the same principles to test the sensor on those gauges as well.
This can happen sometimes if a gauge is powered on at atmospheric pressure and the sensor is laying sideways on a desk. Remember that the sensor needs to be mounted upright in order to read correct vacuum, and will take a few seconds for the reading to equalize. You can simply hold the sensor upright and the reading will adjust to atmospheric pressure in a few seconds.
If your gauge is still reading TUBE? Or showing dashes, there may be some damage to the sensor itself. The two thin filaments inside the sensor may have come apart. This can happen with excess vibration, contamination, incorrect cleaning or simply dropping the sensor. Remove the sensor from the cable connector gently. Do not twist it, just hold the connector in one hand and the sensor in the other and pull gently.
The VGT-500 sensor has a plastic key that can sometimes break off if it is uncoupled roughly. The Agilent 531 and 536 are fully-welded stainless steel and will not break this way. The sensor can be quickly and easily tested with any multimeter. Set the meter to the ohms setting and check the connection between each of the 4 pins. All of the pins should be electrically connected and show a resistance of 1-2 ohms between them.
If Your Readings Appear Inaccurate
So what if your gauge is powering up and reading vacuum, but you think the readings are inaccurate? We’ll troubleshoot these gauges in the next slide – inaccurate readings can be caused by faulty equipment, leaks or contamination to the sensor, just to name a few.
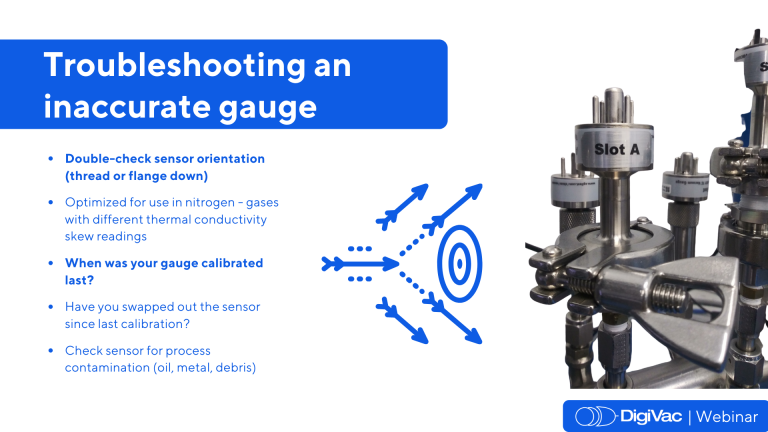
Remember that the gauge will not read accurately if the sensor is not mounted upright. One thing to consider is the integrity of your vacuum system. Consider if you’ve had the base pressure of your vacuum pump tested recently. It may need oil, new tip seals or other servicing. Try mounting your Bullseye Precision Gauge to the inlet of the pump with some stainless-steel piping or a length of vacuum-rated hose. You may experience a false pressure drop briefly as the pump winds up and ejects air into the body of the sensor, but within a few seconds, the readings will level out. Check the manufacturer specs for your pump’s base pressure, and if it cannot be achieved, send the pump for service.
Your incorrect pressure may also be the result of a leak in your system. Shut off your vacuum pump and if you see a precipitous rise in the reading, you may have a leak. Double check the integrity of all your threaded connections, check the vacuum specs for your hose or tubing, which may be outgassing and causing a false pressure drop.
Then check the manufacturer accuracy specs for your particular gauge. Not all gauges read the same ranges of vacuum with the same accuracy.
Are you using a backfill gas or another process gas? Our gauges are optimized for use in nitrogen. All of our gauges are calibrated under real vacuum in our facility and we use clean bottled nitrogen to backfill our system. Systems using gases with different thermal conductivity such as argon, neon or helium will experience inaccurate readings. We currently don’t manufacture gauges optimized for use in other gases, but we can assist you in calculating the equivalent readings for use with your gas of choice.
Consider how long has it been since you’ve had your gauge calibrated. Even a rarely-used gauge used in clean, dry air won’t stay perfectly calibrated forever. Since there’s no such thing as a perfect vacuum here on earth, contaminants will infiltrate any vacuum system. When foreign matter meets the sensor, it alters the thermal conductivity of the wires within. The readings will “drift” and become less accurate over time. This is a totally normal side effect of use, and not a sign of damage. Perhaps you’ve swapped out the sensor since last use. We typically don’t recommend this except for emergencies only. We consider the gauge and sensor a mated pair as we calibrate the gauge for optimal linearity with that sensor in particular. We recommend calibration of the gauge when a new sensor is swapped in – Digivac can provide this service for you or we can instruct you in field calibration process
If your gauge is still inaccurate, you can inspect the sensor for process contamination such as oil, debris or metal flakes. We use an otoscope in our facility to peek inside the sensor, though often contamination can be seen with the naked eye or with the aid of a lighted magnifying glass. If you find contamination inside, we recommend that you follow the cleaning instructions outlined in the sections above.
If It Is Time for a Gauge Calibration
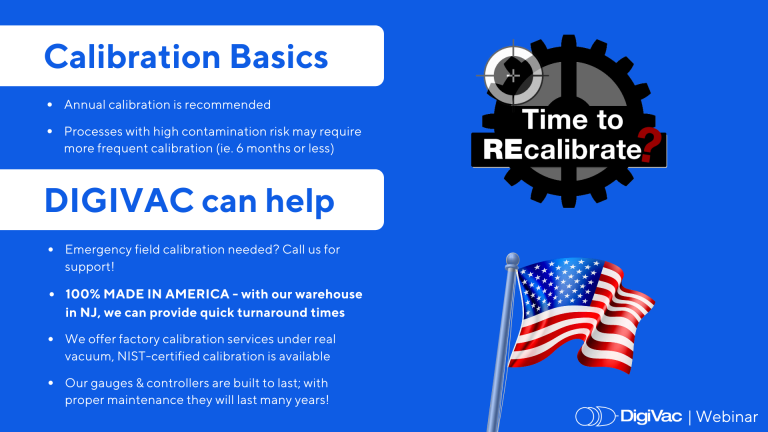
We recommend calibration intervals of once per year typically, with intervals of 6 months recommended for processes with a lot of contaminationIn clean, dry environments that are mostly nitrogen, calibration will drift less over time. In vacuum drying, lyophilization, or freeze-drying applications where the gauge is constantly bombarded in water, more frequent calibration may be necessary, as well as in very dirty environments like heat treating, metalizing and oil purification and distillation where lots of contaminants come in contact with the sensor wires.
Field calibration is possible with most of our gauges, but you need a vacuum system capable of achieving and holding pressures as low as 5 millitorr, and another gauge whose readings you trust. For best results, we recommend sending gauges back to DigiVac for factory calibration. We also offer NIST-certified calibrations for an additional fee.
Keep in mind we periodically update the software for our gauges to compensate for the changed thermal conductivity of new sensors from the manufacturer. If your gauge is very old and your sensor is very new, you may need a software update to get the most accurate calibration.
If Your Vacuum Controller Has Issues
Up until now, we’ve discussed instruments designed simply to read vacuum, not to change it. Now we’ll discuss some common issues for instruments equipped with valves to control vacuum. Among these gauges are our Vapor Pressure Controller, our StrataVac which can be equipped with a variety of both valves and sensors for precision wide-range control, and our new Concerto vacuum controller, capable of controlling vacuum on 4 separate channels with just one instrument and a streamlined, user-friendly interface.
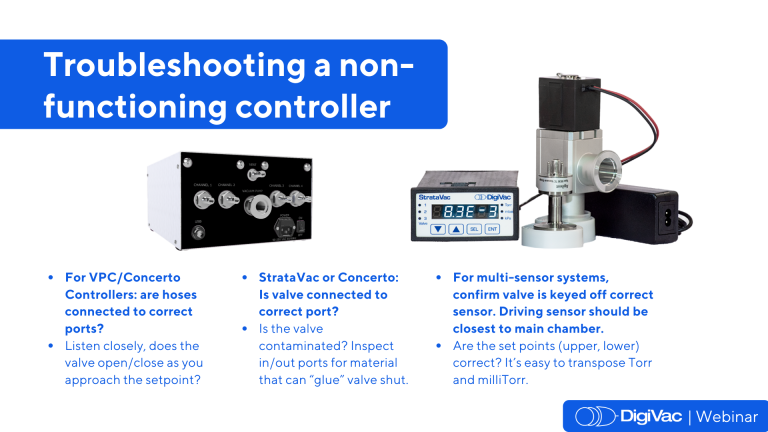
Ensure your pump and vacuum system are connected to the correct ports on the back of the gauge. If a pump is attached to the system port, or vice versa, the gauge will not control vacuum. Listen closely to the sound of the valve solenoid over the noise of the pump – can you hear it activate as the vacuum level approaches the setpoint?
Make sure the gauge is connected to the right port on the back of the gauge. The valve card on the back of the StrataVac gauge has two connectors and the valve is plugged into the top one.
If you are using the valve to control a system that is potentially contaminated, remove the valve from the system and inspect the in and out ports for oil that may be gluing the valve closed.
With a multi-sensor controllers, the valve will only be keyed to one sensor, and will activate at the setpoint as read by that sensor. Ensure that the driving sensor is as close to the main chamber as possible. Make sure you’ve entered your setpoints correctly. Some folks mix up Torr and Millitorr.
So what if your gauge is controlling, but not quite as expected? Maybe you can’t achieve the setpoint or your pump seems improperly powered. If you have your valve and gauge hooked up to your vacuum system, but the pressure in the system is not being controlled, first make sure that the gauge is reading vacuum accurately. We can’t control a system that we can’t read – you can review our slides on how to troubleshoot vacuum readings in this webinar.
Connect your sensor to the largest part of the system, away from the valve. If the valve is too close to the sensor, the excess air in the body of the valve that is released when the valve activates will briefly cool the thermocouple and cause erratic readings. Make sure high setpoint is higher than the low setpoint.
Is your vacuum hose the right size? Too-large hoses or those with a thin-diameter wall can be pulled closed by the force of the vacuum generated by the pump. We can assist you in choosing the right hose for your pump and application. An underpowered vacuum pump will not bring the system down to the setpoint, and an overpowered vacuum pump will fight against the valve and struggle to hold the setpoint. This can also be the result of a leak in the system.
If You Need To Ship Your Unit To Us
NOTE: Before we can issue an agreement for return of any equipment, the DigiVac Decontamination Form must be filled out and signed by an informed and responsible member of your organization.