If you want to be certain that your pressure gauge will give you accurate results, it’s important that you know how to clean it correctly. Pressure gauges are very sensitive pieces of equipment, and even the slightest bit of contamination could throw off results. We want you to be able to use your pressure gauge for a long time, so we’re going to go into how to effectively clean a pressure gauge. The process itself isn’t very difficult, but it’s crucial for the longevity of the instrument.
Why Do We Need To Clean Our Pressure Gauges?
Several common contaminants can find their way into your vacuum gauge or gauge tube that might make the readings less reliable. For instance, you could have contaminants such as alcohol, certain oils, or other particulates that made their way into your gauge or tube housing. You want to make sure that you clean your pressure gauge if you are seeing variability in your vacuum readings that don’t make sense to you. Properly cleaning your vacuum sensor before sending it in for repair or calibration is an important first step. If your sensor is contaminated and just needs cleaning, you can get back up and running a lot faster than sending it in for evaluation. Understanding the dos and don’ts of cleaning your gauge can save you time and money.
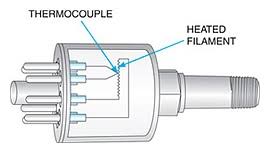
Thermocouple Tube Cleaning
Step One
The first step for effectively cleaning a digital pressure gauge thermocouple tube is to remove it from the attached cable. Make sure that you do not twist it in order to detach it, as all you need to do is pull it away, and it should detach easily. Flip the sensor upside down so that its threads face upward.
Step Two
Using a funnel, pour roughly a tablespoon of solvent into the sensor’s stem. Isopropanol is the solvent to use for a thermocouple plus sensor, but if you have an Agilent 531 or 536-type sensor, you’ll need to use acetone instead. Cover the vacuum interface with your finger and gently shake the solvent around.
Step Three
The solvent needs time to work, so allow it to sit for about an hour. Remember to return to it and give it a few more shakes throughout that period before dumping the solvent out.
Step Four
Repeat steps two and three until the solvent looks clear when you pour it out of the sensor. Allow the sensor to dry on its own, and do not use a cotton swab or compressed air to try and speed up the process.
DigiVac wants you to feel confident when using the instruments that you get from us. If you buy a digital vacuum gauge from us and have any questions, we’ll be glad to answer them and help you make the most of your purchase.