How to Set a Recipe on the SNAP
How does the SNAP make Vacuum Science Simple?
A little while ago, we released a short and simple video about setting a recipe for a SNAP Vacuum Controller, and in today’s blog, we’ll be highlighting in detail how to set a recipe for those who prefer reading instructions. Now, if you’re new here, you might be wondering:
What is a SNAP?
SNAP stands for Simple, Nimble, Automatic Process and is a vacuum controller that essentially automates your processes. It provides precise measurement, control, and venting all in one neat little box that can be hooked up to your vacuum chambers or systems. You can learn more about it in this overview video here!
How Does It Do That?
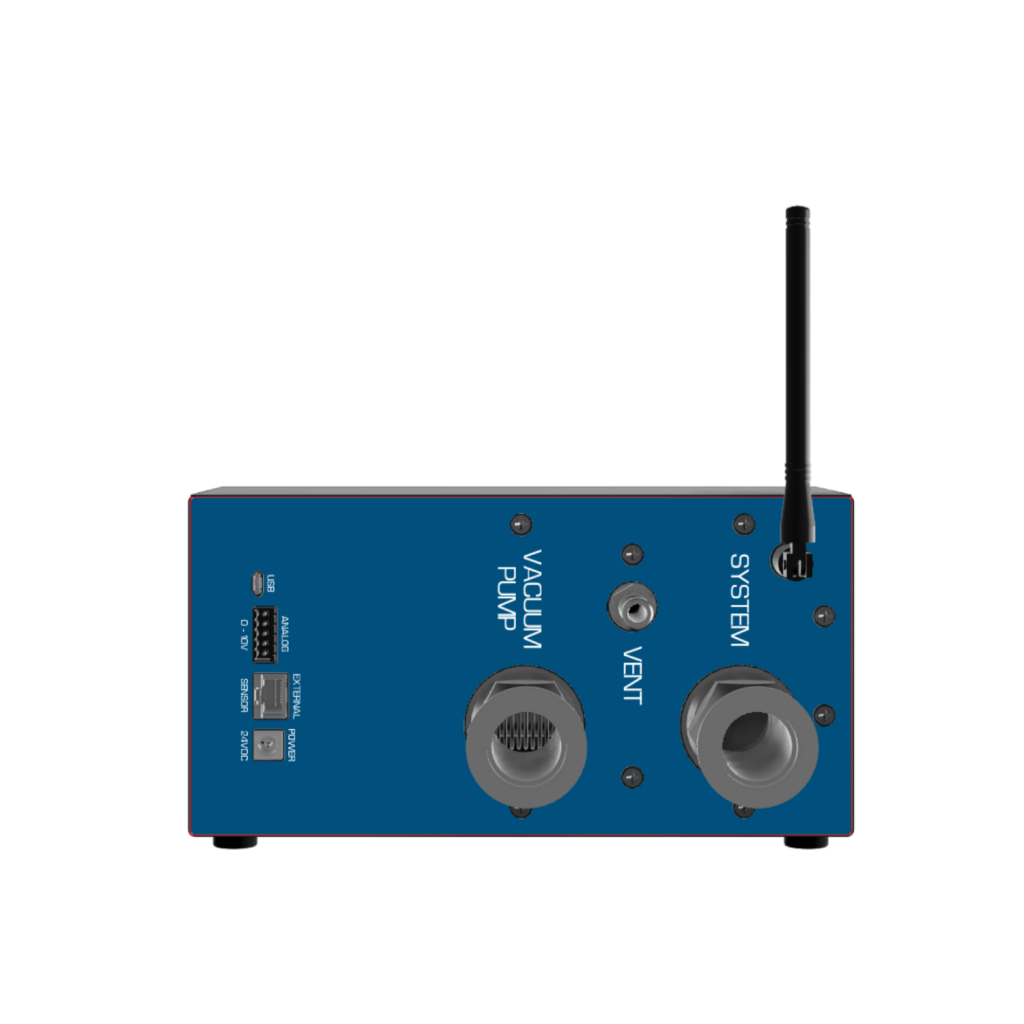
Rather than having to manually sit there and twist valves or adjust hoses, the SNAP can do all of that for you. Simply connect the hose leading to your vacuum pump to the part on the back of the SNAP labeled “Vacuum Pump,” then connect the hose leading to your system to the “System.” All of this can be found in our Quick Start Guide, and there’s also a video about it. Need to hook it up to a vacuum oven? Here’s a video on how to do that too!
How to Set a Recipe on the SNAP
Setting up a recipe on the SNAP Vacuum Controller is one of the greatest features the SNAP has. Able to store 10 recipes, with 24 steps each, your processes can be as detailed and precise as you want them to be.
With the SNAP, you are able to automate your process. No need to hover over your system and manually twist valves or fuss with hoses. In this short blog, we’ll give you step by step instructions on how to set and save your own recipes on your SNAP, and how we can make vacuum science simpler for you.
Step by Step Instructions
Click on the drop down arrows for more detailed instructions!
Step 1: Turn Device on
Turn the device on using the switch on the bottom right of the device
Step 2: Go to Settings
Locate the Settings icon in the bottom right hand corner of the touchscreen.
Step 3: Select Recipe
Select which recipe you want to edit under “Recipe to Edit.”

Switch between recipes by tapping the left and right arrows, which go from Recipe 1 all the way up to Recipe 10.
Step 4: Tap “Edit Recipe”
Once the Recipe you’d like to edit is selected, tap the box labeled “Edit Recipe” in the top right hand corner of the screen.
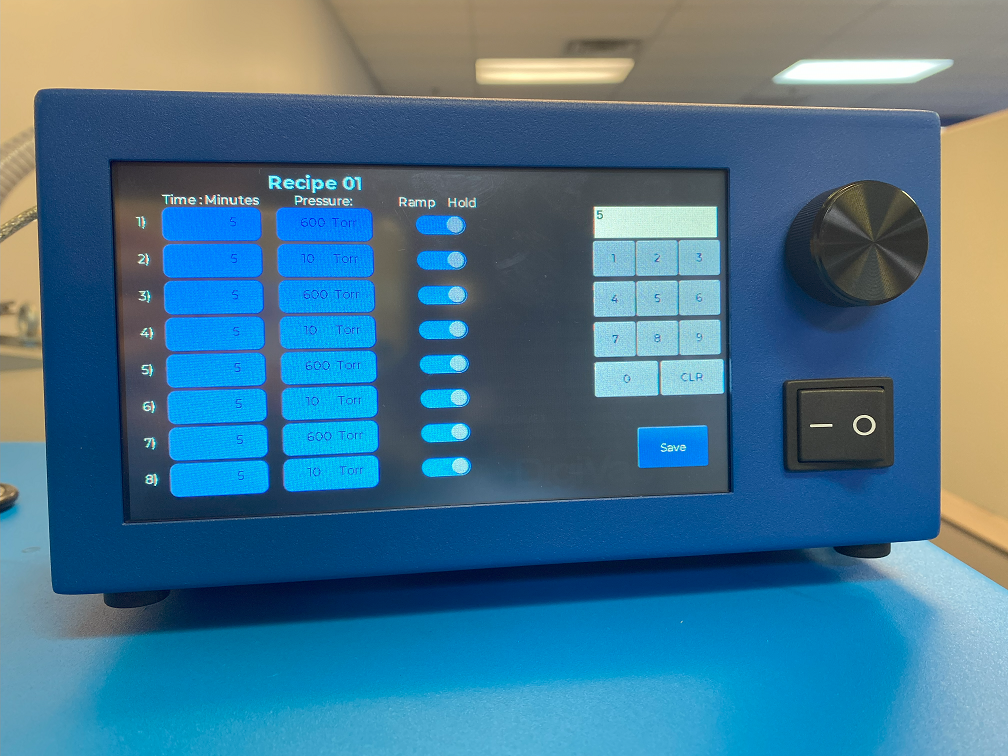
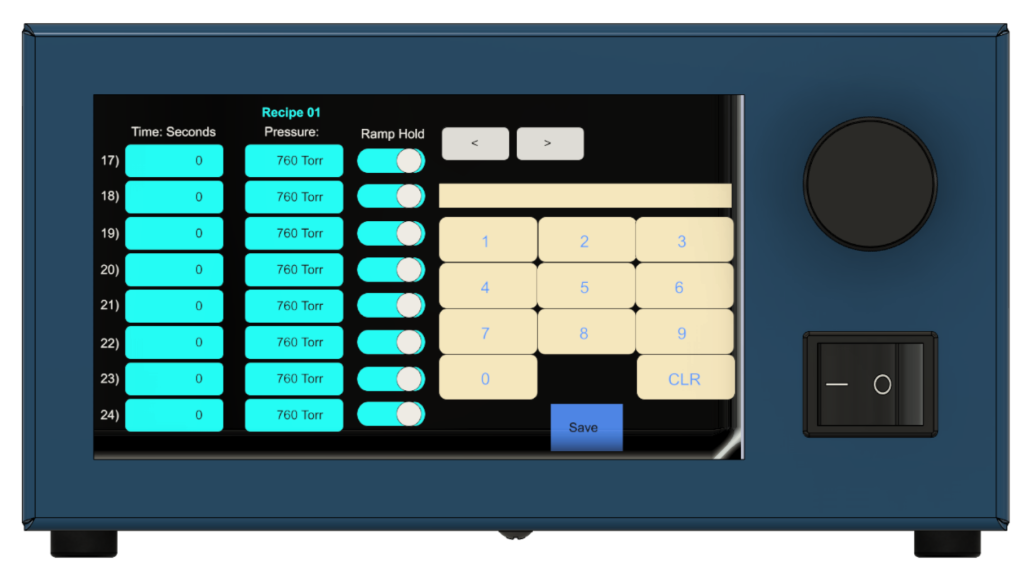
WHAT YOUR SCREEN SHOULD LOOK LIKE: A display screen with the Recipe you are editing at the top, two columns labeled Time in Seconds and Pressure on the left, and a number pad on the right. Between the number pad and the column labeled Pressure will be a column of toggles labeled Ramp Hold. Above the number pad will be arrows pointing left and right, and those will flip through the pages of Steps since you can set up to 24 Steps per Recipe. Each Step is labeled with a number on the far left, beside the Time in Seconds column.
Step 5: Input Time or Pressure with the Number Pad
Simply input the Time or Pressure you would like using the number pad

Tap on the corresponding boxes under the Time in Seconds or Pressure columns.

For example, if you want to set the Time for 10 seconds on certain Setpoints, you would just have to input a 10 by pressing 1 and 0 on the number pad.  From there, just tap the boxes under the Time in Seconds column to set it for that step.  The same can be done for Pressure.
Step 6: Adjust the Setpoints to Ramp or Hold
Adjust using the toggles beside each Step by tapping on them.

The little white circles will move accordingly to either the Ramp side or the Hold side upon tapping them

Tells the SNAP whether you want to Ramp the Pressure to what you’ve set in the box, or if you want to Hold it at that particular Pressure as you’ve defined it in that Step.
Step 7: Hit Save
Once you’ve input all your Steps for your Recipe, simply tap Save at the very bottom of the number pad.

Return you to the previous Settings page where you will see boxes labeled Recipe to Edit, Recipe to Run, and Select Units with arrow keys.
Step 8: Select Recipe to Run
Under Recipe to Run, use the arrow keys to select which Recipe you want to use.
Step 9: Tap the Home Button
This returns you to the very first screen.
Step 10: Switch to Recipe Mode
This tab can be found in the bottom right on the screen, above the Settings icon.

Tap on it to put your device in Recipe mode.
Step 11: Hit Play!
Double check that the Recipe number in the top left hand side of your screen is the one you want to run.

Press the large Play button on the left hand side of your screen.

Watch as the SNAP follows the steps and setpoints you just input.
Want to Know More?
Curious about what else DigiVac has to offer? We’re out here simplifying vacuum science one product at a time, so feel free to check out our website! We’ll also happily answer any inquiries or questions you have so feel free to contact us as well!
